Wednesday, May 30, 2012

Annual Gift Ideas for Bee Loving and Beekeeping Dads!

If you're like me (and if your dad is like my dad), finding the right gift for Father's Day can be a real challenge. My dad isn't really into "stuff," which is one of the many things I love about him.   If your dad's a  beekeeper (or a bee lover), though, I have a few ideas for some cool stuff that will really impress him!  

For the bee loving dad:

Your dad doesn't have to be a beekeeper to be able to enjoy his very own pollinator garden. Here's a link to a Pittsburgh Post-Gazette column by Sandy Feather, who works for the Allegheny County Cooperative Extension.  Her column offers a nice list of plants in our region that are great for bees.  Sandy's column also offers excellent suggestions for how to be a bee-friendly gardener.  

If your dad is a bee lover, then make (or buy) him a mason bee home. Mason bees are solitary bees and don't require the tending that honeybees do.  They're lovely pollinators, though!  Here's a link to information about how to make a mason bee hotel from a gardener in the UK. You can find bee houses for sale at Amazon and many other places on-line, most are less than $20.  Search for "mason bee house" or "bee house."

For the beekeeping dad:

If your beekeeping dad lives in the Pittsburgh area, then you'll really impress him if you give him a local queen raised by one of our area's Master Beekeepers, Steve Repasky! You don't have to actually obtain the queen--Steve can give you a gift certificate to give to your dad--but I guarantee this gift will blow your dad's veil off!  Email Steve at meadowsweetbees@gmail.com (and tell him you got the idea from Jennie and Robert!).

If your beekeeping dad has beeswax he needs to filter, another idea is to make him a solar wax melter.  If you search the internet for "solar wax melter" you'll find a number of plans, some elaborate and some quite simple. Here's a link to Linda's Bee Blog for how to make and use a simple solar wax melter.

Getting a gift certificate for a honeybee queen or making a solar melter a bit too out there for you?  Here are a few more traditional ideas:


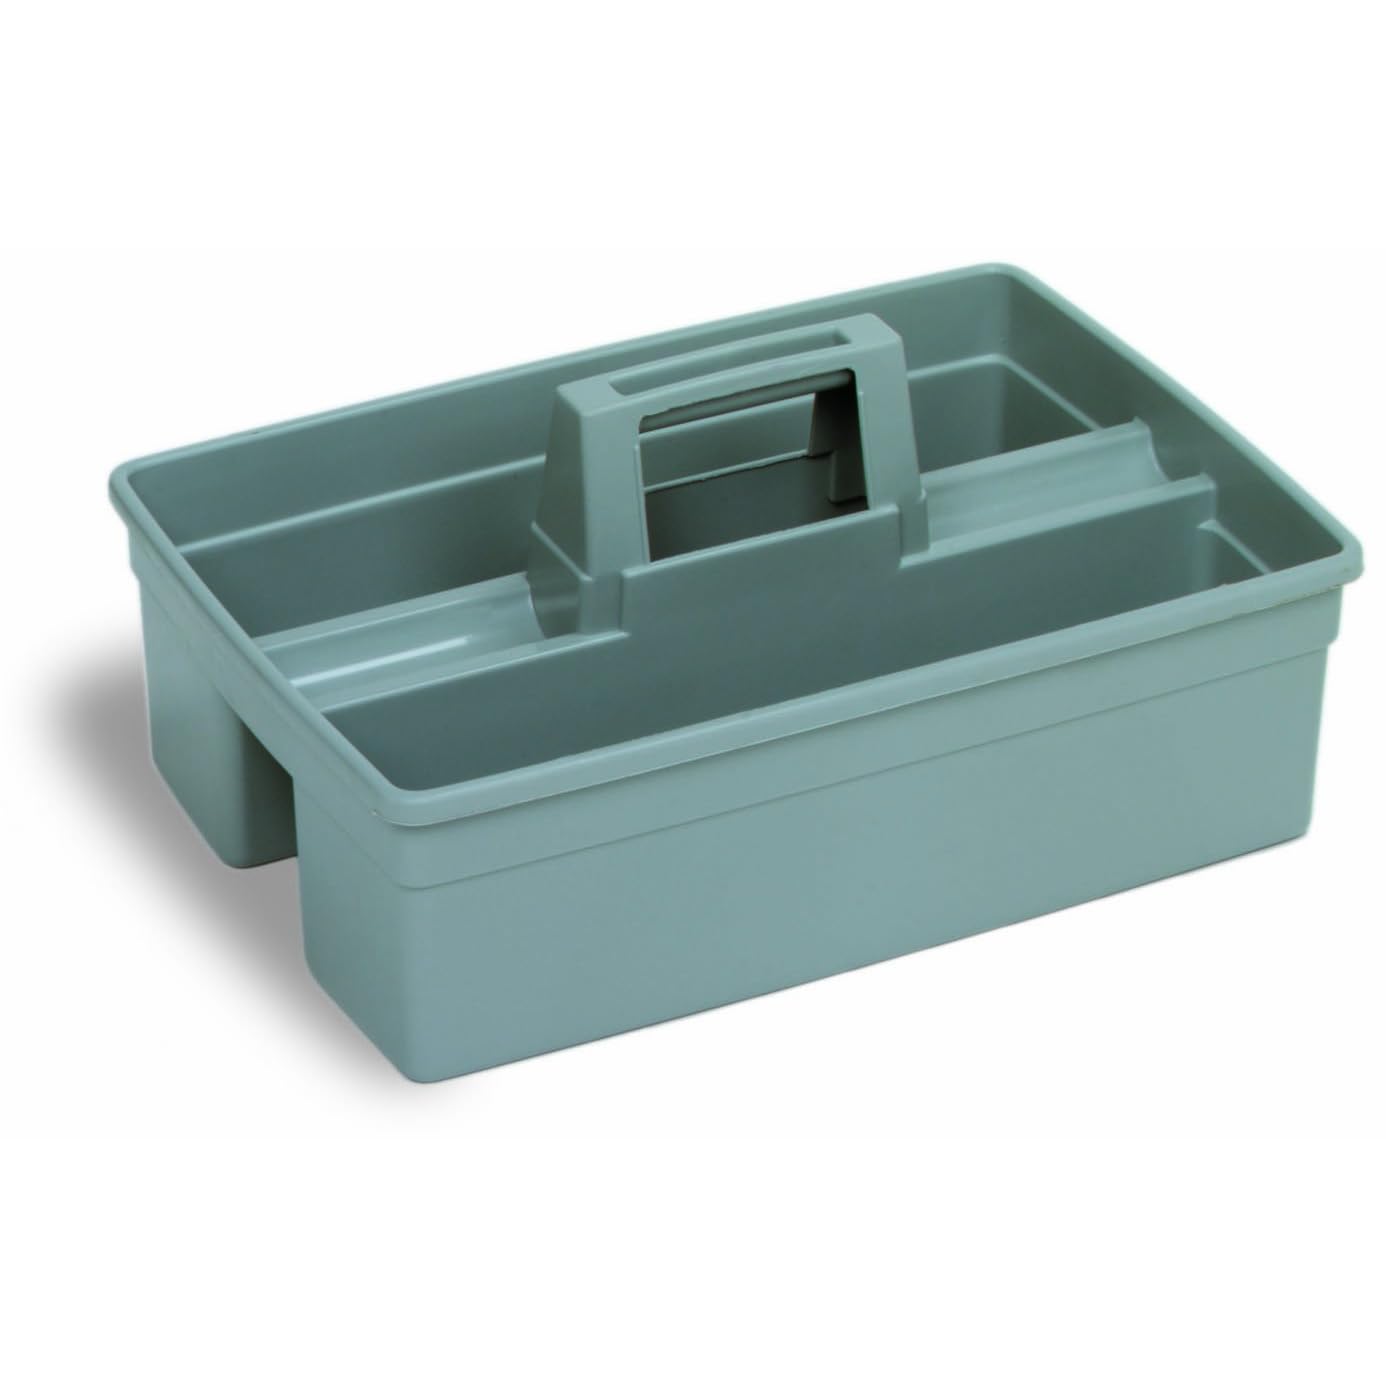
One handy item that we use regularly is a cleaning caddy, which I've picked up at thrift stores around the area.  They're big enough to hold hive tools, a lighter, some tape, extra gloves and other items that are nice to have in one place when working on a colony. They're not expensive at all (especially if you get them at a thrift store!).   Add a nice j-hook hive tool to the cart and a fancy bow and you're good go!  
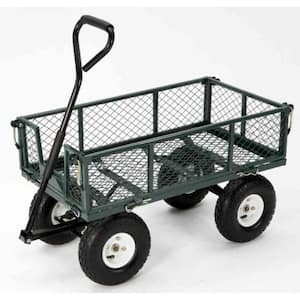
If you're looking for something a bit more splashy, consider a garden cart with sides that can pull down (available in many "big box" stores like Home Depot, K-Mart and Loews).  Carts like these make it easy to haul bee boxes to and from the apiary as well as all of the sundry items beekeepers need while tending their hives.  They range in price from about $75 to $150.  


Still need more ideas?   Take a look at these previous posts:  


Saturday, May 26, 2012

Pickled Garlic Scapes


What a surprise to see the garlic scapes already winding and twisting their way out of the garlic plants yesterday.  They're at least a week if not more ahead, like many plants this year. I think of June as scape month.   Scapes are the garlic plant's flower heads. If they aren't snapped off when they emerge, then the plant will put lots of energy into the scape rather than into the garlic head beneath the ground.

Many folks just snap them off and compost them but they're edible (although Robert has his doubts).  They're not a strong as the garlic clove, but they do have a distinct garlic flavor and can be used anyway you'd use garlic:  saute them and put them in a pasta sauce, chop them and put them in a vinaigrette, add them to soups.  Search for "garlic scape recipes" on-line and you'll find lots of ideas. You can even grill them and eat them like a vegetable.  They're a delicacy!

Since my proclamations have not convinced Robert of their appeal, I decided to experiment by making garlic scape pickles. I figure if they're not good, I haven't lost much.   I hasten to add that this is a tried but not yet TASTED recipe, so I can't vouch for the flavor (or even the texture) of the scape pickles.  I just made them today and they need two weeks to develop.   I don't expect them to be very sweet pickles--in fact, I'm hoping they're more like dilly beans than anything.   I'll report back with tasting reviews once we give them a try.

TASTING UPDATE!  During the spring honey extraction, we tasted the scape pickles, with rave reviews.  They aren't too sweet (or salty)--very much like dilly beans.  Next time, I think I might trim off the fine, dark tips of the scapes, which tend to be a bit chewy when pickled.  This recipe, though, is a keeper!

Here's the recipe:


PICKLED GARLIC SCAPES WITH HONEY

pack the scapes into the jar
Makes 4 pints (or about 8 1/2 pints)

A big bowl of garlic scapes (about 1 1/2 pounds)
4 cups cider vinegar
2 cups water
4 tablespoons kosher salt
2 tablespoons honey
2 teaspoons dill seed*
1 1/2  teaspoons black peppercorns*
1 1/2  teaspoons yellow mustard seeds*

*You can use other seasonings--red pepper flakes, fresh basil, oregano, thyme--sky's the limit!

Preheat oven to 250 degrees.  Wash mason jars in hot soapy water and place on a cookie sheet.  Put jars in the oven for 30 minutes to sanitize.   Fill a canner with water about 2/3rds of the way full and bring to a boil. This will take about 20-30 minutes, too.

In a large, non-reactive (not aluminum) sauce pan, bring the vinegar, water, salt and honey to a boil and keep hot while you prep the jars with the scapes.

Thoroughly wash the scapes.  Boil some water and pour it over the lids to sterilize and also to ensure that the lids make a good contact with the jar.

Usually when canning, I fill the jars all at once and then cap them, but with these I had to do them one at a time as the scapes kept escaping from the jars.  I used eight 1/2 pint jars, but can appreciate why wide-mouth pints might be easier to work with.

When the jars are ready, place about 1/2 teaspoon of the dill seed, 1/4 teaspoon of peppercorns and mustard seeds in each.  Coil the scapes around the outside, pressing down firmly and then filling the center with scapes that have been cut to the length of the jar.  Pack them as tightly as you can.  Pour the hot brine over the packed scapes, filling to about 1/4 inch from the top.  Place the lid on top of the jar and screw on the band being careful not to screw it on too tightly.  Proceed with the rest of the jars.  Place in a boiling water bath for 15 minutes.  Turn off the heat, remove the lid and let sit in the water for another 5 minutes.  Remove the jars to the counter.  Check the seals and store the pickles for two weeks to let the flavors develop.  Store any jars that did not seal in the refrigerator.
Fill with the brine


Jars ready to go in the water bath

boiling water bath for 15 minutes


VOILA!

Sunday, May 20, 2012

Whole Wheat Honey Quick Bread


We generally bake yeast bread a few times a week and usually use some version of  "no knead" bread first developed by Jim Lahey and made famous by Mark Bittman of the The New York Times.  That recipe requires the dough to sit over night, so it takes some advanced planning.  Forgot to do that last night, and here we were Sunday morning without any bread for brunch.  I dug around in my recipe collection and found this Whole Wheat Honey Quick Bread, which I cut at some point from a newspaper--who knows how long ago.

This bread is amazing!  It is almost like a yeast bread (though doesn't have the yeast flavor or smell).  The texture is light yet the crumb is also sturdy.  It's delicious right out of the oven and also good toasted, too.  The secret is the magic that happens when buttermilk (or sour milk) and soda combine.  You can see the dough rising almost as soon as you combine the liquid and dry ingredients.  It takes about 45-55 minutes to bake, so it's not as quick as biscuits or muffins, but this is a great alternative to yeast bread.  If you like this bread, also check out Honey Oat Quick Bread, posted last year.


WHOLE WHEAT HONEY QUICK BREAD

1 1/2 cups whole wheat flour
1 1/2 cups unbleached all purpose flour
1 teaspoon salt
1 teaspoon baking soda
1 2/3 cups buttermilk (or plain yogurt or 1 1/2 cups
         milk and two tablespoons white vinegar)
1/2 cup honey
1 egg

Preheat oven to 325 degrees.  Lightly grease a 9x5 inch loaf pan.
Whisk dry ingredients together in a large bowl.  In a smaller bowl, thoroughly mix buttermilk, honey and egg until well combined.  Pour liquid ingredients into bowl with dry ingredients and, using a rubber spatula, quickly fold ingredients together until just combined (do not over mix).  Pour into prepared loaf pan. Bake for 45-55 minutes, turning mid-way to ensure bread bakes evenly. Bread is done when it's firm and a toothpick inserted in center comes out clean.    Cool for about 10 minutes before slicing.

Friday, May 18, 2012

Honey and Infants (+ healthy salads for new parents!)

My niece and her husband just had their second child (a boy!) and I've been making some healthy meals to keep them well fed while they settle in with their new one.  Preparing food for the newly expanded family and an email exchange with our friend Jarrett (also a new papa and a big honey fan!) made me look more closely into the reasons that infants should not be fed honey.  My niece is breastfeeding and I wanted to be sure that  any honey I used in the meals I'm making wouldn't cause any trouble.  So, first things first: I'm not a doctor and I'm not dispensing medical advice here, but this WebMD page suggests that if eaten in "food amounts," then honey is fine for a breastfeeding mom to eat.

Why shouldn't infants (under 1 year old) have honey?  An in-depth 2002 article from American Family Physician offers a wonderful overview of this issue, which is worth a read if you're a new (or old!) parent  with questions.  The reason that raw unpateurized honey should not be fed to infants under 1 year old is that it may contain botulism spores that a baby's young intestines are not yet equipped to combat.  The American Family Physician article also includes this surprising information:  though infant botulism is rare worldwide, most diagnosed cases are in the U.S.  The article attributes this to more awareness in the US (not that there are more spores in the US).

Looking for less in-depth but reliable info about infant botulism and honey?  Here are two great sources:   the Mayo Clinic website and the U.S. National Library of Medicine's Pub-Med Health webpage.   If you want to do your own searching for more information about this, try "infant botulism and honey" as search terms.

Two Healthy Salads for New Parents (both with lovely lime dressing!)


Quinoa, Red Pepper & Black Bean Salad with Honey-Lime Vinaigrette
Quinoa (pronounced KEEN-wah) is a seed that growing in popularity primarily because it's a great source of protein and easy to make.  The Food and Agriculture Organization of the United Nations compares the nutritional quality of quinoa to dried whole milk.  You can find it now in many grocery stores near the rice section.  Most of the quinoa we get in the US is grown in Bolivia.  As with just about every food option, the popularity of quinoa has advantages and disadvantages.  Want to read more?  Check out "The Paradoxes of Quinoa" from the Alpha Galileo Foundation.)

1 cup quinoa
2 cups cooked black beans (or 1 can, drained)
1 red bell pepper, diced in 1/4- inch dice
2 scallions, sliced in 1/8-inch circles (include some of the green part)
1-2 tablespoons honey
juice of one lime
1 tablespoon red wine vinegar
2-3 tablespoons vegetable oil
salt and pepper to taste

Place quinoa in sauce pan with 2 cups water, cover and bring to a boil. Turn down heat and simmer for about 20 or until all the water is absorbed.  Cool.  Place cooled quinoa in a large bowl.  Add the peppers, beans and scallions.  In a small jar, combine the honey, lime juice, vinegar and vegetable oil and shake to emulsify.  Pour over salad and mix well.  Taste and add salt and pepper as needed.  Refrigerate until ready to serve.

This delicious corn salad comes from Jarrett who claims they're making it at least twice a week!

Grilled Corn, Avocado and Tomato Salad with Honey-Lime Dressing
2 ears fresh sweet corn, grilled and scraped from cob (remove husks and grill over medium heat for about 10 minutes, turning--the corn should have some brown spots on it and be tender, but not mushy)
1 pint grape tomatoes, sliced in half
1 avocado, diced in
2 ears fresh corn
2 tablespoons fresh cilantro
Gently toss all of the above in a bowl

Honey Lime Dressing
juice of one lime
3 tablespoons vegetable oil
1 tablespoon honey
1 clove garlic, minced
salt and pepper to taste
dash of cayenne (optional--I'd leave this out if making for a new breastfeeding mom)
Place dressing ingredients in a jar and shake vigorously to combine.  Pour over salad and gently toss.  Let sit for 10-15 minutes so flavors meld and deepen.  Enjoy (and thanks, Jarrett!)


Wednesday, May 16, 2012

SWARM!


We had an exciting swarm day at the apiary yesterday. You can see here that a swarm landed on the trunk of a small pear tree not far from the apiary.  Tuesday was the first sunny day after several days of rain and that it often when a colony intent on swarming will make its escape.

We lucked out with this one, since it wasn't high off the ground, making it somewhat easy to coax into a new hive box.


Below you can see the bees beginning to march into the box that Robert set beside the swarm.  We saw the queen (though not quickly enough to get a photo of her!), and once the bees could tell that the queen was in the box, they began to march in and take possession.

Here you can really see how the bees are beginning to march down from the trunk of the tree into the box.

Though dramatic to watch, swarms are not dangerous (even though they certainly can frighten people).  Honey bees in a swarm are intent upon finding a suitable home to relocate and are not inclined to sting.

A swarm is the way that honey bees reproduce their colonies.  The old queen from the mother colony leaves with the swarm--usually about 1/3 to 1/2 of the bees in the mother colony.  They leave behind several swarm cells where a new queen will emerge to carry on.


The photo on the right was taken about an hour after we saw the queen go into the box.  You can see here that there are no more bees on the pear tree trunk.  They've headed inside to get used to their new home.


Monday, May 14, 2012

Colony Collapse Disorder: Great Brief Explanation!


If you've had a hard time wrapping your head around the concerns bees are facing, we highly recommend this interview with Dr. Marla Spivak, MacArthur Fellow and Distinguished McKnight Professor in Entomology at the University of Minnesota.

Here, Dr. Spivak is interviewed by Lynne Rossetto Kasper on Kasper's weekly radio, The Splendid Table, which airs in Pittsburgh on Sundays from 1pm to 2pm  (Essential Public Radio, 90.5 FM).  I look forward to the Splendid Table each week for great discussions about food, eating and issues that affect our food supply.

Here's a recipe for Honey Ginger Lemonade, also from The Splendid Table:

Honey Ginger Lemonade
2 ounces fresh ginger, peeled, cut into thin disks ( cup)
¼ cup honey, or more to taste
⅛ teaspoon kosher salt
¾ cup fresh lemon juice (from about 4 large lemons)

  • Put the ginger in a medium heatproof bowl. Bring 2 cups cold water to a boil, then pour it into the bowl and stir to agitate the ginger. Slowly pour in the honey, stirring until it's dissolved in the concentrate. Add the salt, cover, and let steep for 10 minutes.
  • Strain the concentrate into a large pitcher (it will keep for 5 days, covered, in the refrigerator), reserving the ginger slices. Add 3 cups cold water and the lemon juice to the pitcher, and sweeten to taste with honey. Set the pitcher in the refrigerator to cool further; store the ginger slices in the refrigerator as well. (The lemonade and ginger slices will keep in the refrigerator for 5 days.)
  • Fill each highball or pint glass two-thirds of the way to the rim with ice, and pour the ginger lemonade over it. Garnish with a slice of the steeped ginger.

Reprinted from The Lee Bros. Simple Fresh Southern: Knockout Dishes with Down-Home Flavor by Matt and Ted Lee. Copyright © 2009 Published by Clarkson Potter.

Thursday, May 10, 2012

Barley Salad and Beekeeping with Danielle!

We visited the hives yesterday with one of our favorite beekeepers, Danielle M., who is one of the farmers at Churchview Farm and an accomplished baker at La Gourmandine Bakery in Lawrenceville.  Danielle is tending six hives at Churchview.   What's the barley salad have to do with this?  Nothing really--just made it as part of celebrating Mom's birthday yesterday (Happy Birthday, Mom!) and wanted to include a recipe in this post.  The salad was a big hit at Mom's birthday party and a breeze to make. Scroll to the bottom for the recipe AND a great find the queen photo!


Danielle showing her skill.  In this hive, we were checking to be sure it was "queen right," which means that it had an active, laying queen.  The best sign that a hive is queen right is the presence of newly laid eggs.


This is a frame of capped brood, which is a great sign of a thriving colony.  The filled in cells are bees in the pupa stage and will soon emerge to join their sisters.


An active entrance of busy foragers bringing in pollen and nectar.  An active entrance like this is a good sign that the colony is thriving.

We were also checking for swarm cells.  A quick way to do that is to tip the super up on its end and look at it from the bottom because the bees build swarm cells on the bottom of the frame.  Here, we see a number of what are called "play cups." These are potential swarm cells--but they don't have an egg or larva in them yet.  A colony will often build play cups just as insurance in case they need to make a queen.  However, on the bottom left side, you can see swarm cell in formation.  There's also one in the center of the middle frame.  In both cases, the cells are damaged, so there won't be any queens emerging there.
Can you find the queen?  Look for a bright blue dot!


BARLEY SALAD

This is adapted from a Martha Stewart Living recipe.  Makes about 8 servings.
1 1/2 cups pearl barley (not instant)
1/4 cup finely chopped red onion
1 tablespoon Dijon mustard
3 tablespoons red wine vinegar
2 tablespoons summer honey
1/4 cup extra virgin olive oil
3/4 cup fresh mixed herbs (I used chives, cilantro, parsley, thyme and oregano)
salt and pepper to taste

Rinse barley well and place in a large saucepan with 3 cups water.  Bring to a boil, add 1/2 teaspoon salt, lower heat and simmer for about 40 minutes until barley is tender.

While barley is cooking, whisk the onion, mustard, vinegar, honey and oil in a bowl.  When barley is finished, drain if necessary and add to bowl, mixing well.  Let cool for about 15 minutes and add herbs, mixing well and adding salt and pepper to taste.  Serve warm or at room temperature.